The Windsor, or double Windsor knot, is named after the Duke of Windsor, who made this tie knot popular. The double Windsor knot is the ideal choice for dress shirts with wide collar spread. If you need to fill that gap of a shark or Kent collar, choose this knot! The double Windsor necktie knot is a very popular knot, but it will also require some practice; therefore it is more suitable for the experienced tie wearer.
Did you know that the double Windsor is the most popular tie knot but also the knot that most men do not how to tie properly? Well, I hope that that the instructions below will help you master this tie knot.
If you like larger knots for your ties, just as they are popular in most parts of Europe, then the double Windsor is your knot. It is a very symmetric tie knot with a triangular shape. Although learning how to tie a double Windsor tie knot is a little trickier than other knots, it is quite simple to master if you follow the steps below. If you are still uncertain on tying the double Windsor, then you may want to view my How to Tie a Windsor Knot Video.
Instructions on How to Tie the Double Windsor Knot:
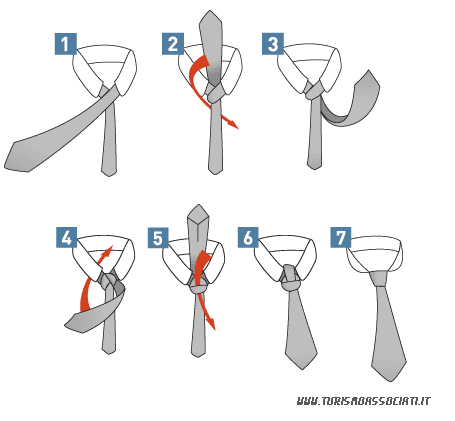
The double Windsor knot requires you to wrap the wide part twice around the narrow part. This means that more length of the tie is required. Start by placing the tie around your neck with enough length showing on the wide side of the necktie. Place the wide part across, and above the narrow part of the tie at a 90 degree angle.
Just like with the half Windsor tie knot, pull the wide part through the loop on the right side of your collar.
Then pull the wide side of the tie back behind the narrow part.
To make a double Windsor knot out of the half Windsor, do the same on the left side. Pull the half finished Windsor knot tight so both wrappings stay in place. Tip: Overlap both wrappings so that a triangular and symmetric shape appears.
Hold the loop open that you created on the last wrapping with your left hand, and pull the wide end of the necktie through the loop.
Slowly pull the Windsor tight.
Tighten the tie and flip down your shirts collars. Tying a double Windsor knot takes a little bit of practice. The most common mistake people make when tying a double Windsor knot, is in step 4. Make sure you overlap both wrappings. This ensures that the gap between both wrappings is closed which will prevent the tie from sliding into this gap. If this happens, the tie will not be centered on the Windsor.
Common mistakes people make when tying a double Windsor tie knot:
The most common mistake people make when tying a double Windsor knot, is in step 4. Make sure you overlap both wrappings. This ensures that the gap between both wrappings is closed which will prevent the tie from sliding into this gap. If this happens, the tie will not be centered on the Windsor. If this is the case, open the tie knot and start from step 1.
The tie is tied too short. Since the double Windsor knot requires two wrappings, you need to leave more length for the wide side of the tie. If this continues to be a problem then you might be too tall (above 63) or have a wider neck. In your case, it is advisable to purchase extra long ties that are about 2-3 inches longer than a regular necktie. Common extra long ties measure about 59-61.
If the illustration wasnt enough to teach you the double Windsor knot, then these video instructions might help. I suggest you take a few minutes to watch this video a few times. Then print out our instructions and start practicing the double Windsor in front of a mirror. I suggest you use an older and cheaper necktie until you have mastered this popular tie knot.